Showing posts with label ios 7. Show all posts

Tuesday, 4 November 2014

Variable-Sized Items in UICollectionView

Variable-Sized Items in UICollectionView

UICollectionView was added last year with iOS 6 and to this date I had no real chance to get acquainted with it since most of my apps were still supporting iOS 5. Doing a fresh app only supporting the latest iOS version finally allowed me to dig into it and share the journey with you.
The special scenario we want to look at today is how we could configure variable-sized collection view cells for items like tags. We want to have the cells adjust their size automatically based on the tag string and ideally we don’t want to have to write any layout code for determine the needed sizes.
Please forgive if the following has a few places where I stumbled. It is these temporary snags that I believe you learn from the most, so I left them in the final article.

Basic Training

We start out with a fresh project from the “Single View Application” template. On the ViewController.xib we add a UICollectionView to fill the entire view.
Adding a UICollectionView
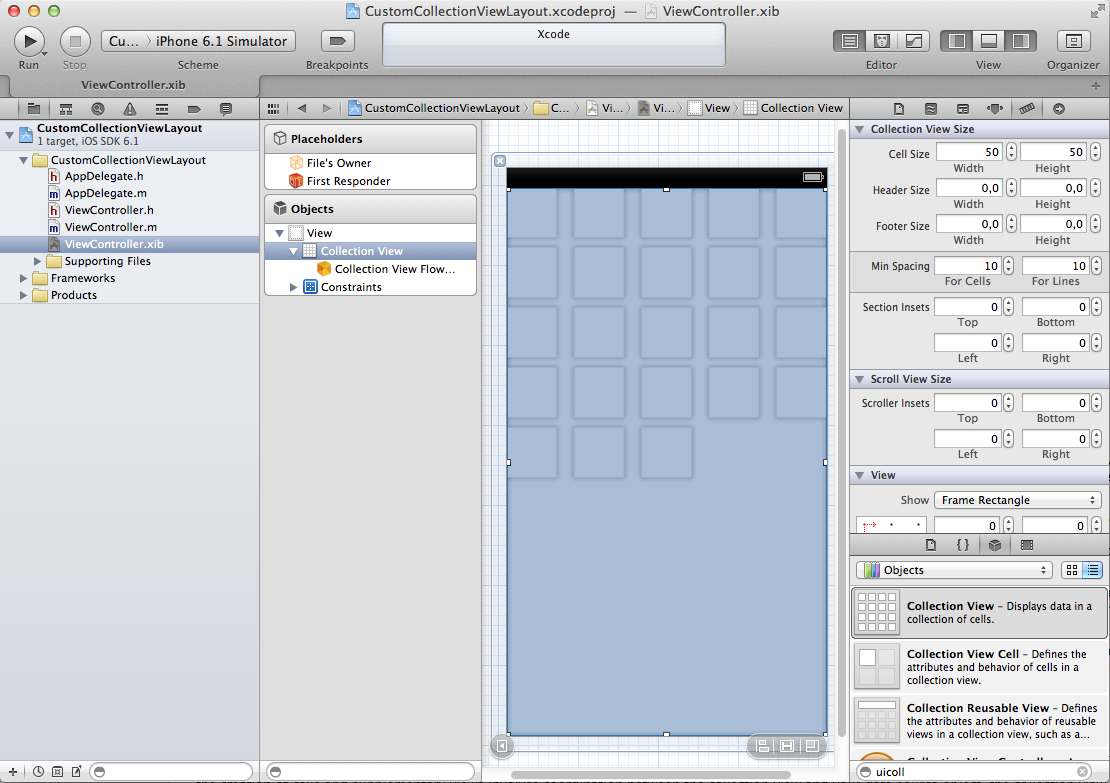
The Collection View – identical to it’s grandfather UITableView – has a delegate and a dataSource outlet which we connect to “File’s Owner”, which is the ViewController class. This puts our view controller also in charge of the collection view’s contents and interactions. We also need an outlet for a reference to the collection view, so we add that with the assistant editor. The outlet property we add to ViewController.h can be weak because being a subview of the ViewController’s view means it is also sufficiently retained.

Cells

For the content we need to design a prototype cell. If you’re using the collection view in a view controller’s XIB you have to register it for use in the collection view in code. If you add a collection view inside a storyboard you create prototype cells inside the collection view’s area and thus won’t have to register the cell identifier. Since we started without a story board, let’s proceed with the manual steps.
We create a prototype cell in Interface Builder, give it a white background, add a UILabel and add some constraints to link the edges with the superview’s edges, 5 points distance. From the Editor menu we choose “Size to Fit Content” for the Label because we want the label text to determine the item size. We’ll see later if that works as we think.
Adding the Prototype Cell
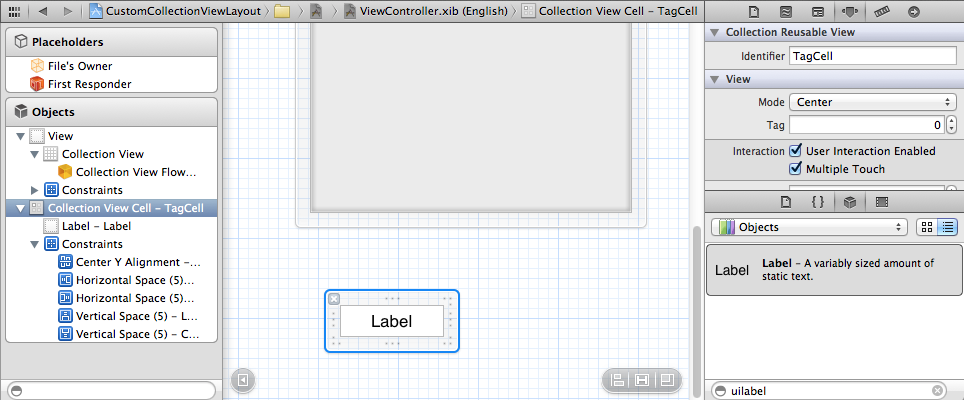
We set the Identifier to “TagCell” so that we can reference our design.
Here we hit the first snag. If you are not using story boards there is no way to get the collection view to use a Collection View Cell from the same NIB file. These are the two methods available for registering a cell design:
  • – registerClass:forCellWithReuseIdentifier:
  • – registerNib:forCellWithReuseIdentifier:
The first instantiates a certain class to be used for a given reuse identifier. This we would use if we created the cell’s view hierarchy entirely in code. The second requires a NIB and thus requires that the cell needs to be the only item in this NIB. This is the second important reason why it is way less work using Collection Views with storyboards, to avoid this hassle.
To remedy this we create a new “empty Interface Builder Document”, which we name TagCollectionViewCell. Thankfully we can simply CMD+X the cell design from one ViewController NIB and CMD+V it into the empty document.
Cell Design moved to own NIB
Next we’ll try to register the cell for use in the collection view and want to see a number of items displayed.

Registering the Cell Design

We need to register the NIB to be used whenever we want a cell for identifier “TagCell”, so we add the following to ViewController.m in the viewDidLoad section.
UINib *cellNib = [UINib nibWithNibName:@"TagCollectionViewCell" bundle:nil];
[self.collectionView registerNib:cellNib forCellWithReuseIdentifier:@"TagCell"];
We only need to implement more methods belonging to the UICollectionViewDataSource protocol to get something to show.
#pragma mark - UICollectionView
 
- (NSInteger)collectionView:(UICollectionView *)collectionView numberOfItemsInSection:(NSInteger)section
{
   return 100;
}
 
- (UICollectionViewCell *)collectionView:(UICollectionView *)collectionView cellForItemAtIndexPath:(NSIndexPath *)indexPath
{
   UICollectionViewCell *cell = [collectionView dequeueReusableCellWithReuseIdentifier:@"TagCell" forIndexPath:indexPath];
 
   return cell;
}
Launching the app now, we see 100 items all using our – probably not award-winning – cell design.
Cells showing up
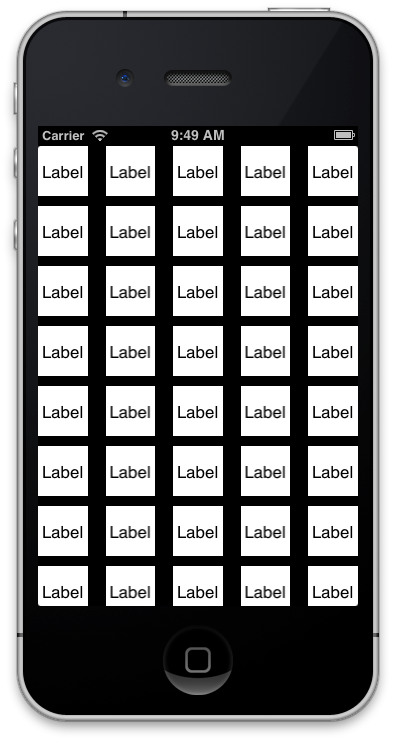
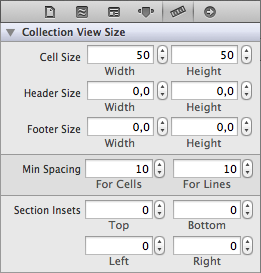
The first observation to make is that all cells have the same size, 50×50 points to be exact. This comes from us not changing the default values in Interface Builder.
UICollectionView Cell Defaults
But before we proceed to giving the cells individual sizes, let’s first improve the design a bit. We remove the white background, add a new TagCollectionViewCell class and specify this as the cell’s class.

Prettier Cells

Instead of relying on iOS to fill a rectangle with the cell’s background color, instead we want to have a rounded rect around our labels.
- (void)drawRect:(CGRect)rect
{
   // inset by half line width to avoid cropping where line touches frame edges
   CGRect insetRect = CGRectInset(rect, 0.5, 0.5);
   UIBezierPath *path = [UIBezierPath bezierPathWithRoundedRect:insetRect cornerRadius:rect.size.height/2.0];
 
   // white background
   [[UIColor whiteColor] setFill];
   [path fill];
 
   // red outline
   [[UIColor redColor] setStroke];
   [path stroke];
}
Note: You need to set the cell’s contentMode to redraw because otherwise a modification of its size would not trigger a redraw of this good looking background.
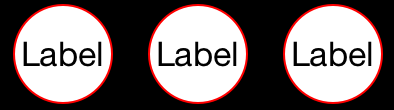
This results in the following look, with parts of the black background shining through. Note that we need to inset the outline drawing slightly because otherwise Quartz would clip the red circle on the outside sections where it touches the view’s frame.
New Background
The next challenge will be to size the cells appropriately for the current Label contents.

Individual Item Sizing

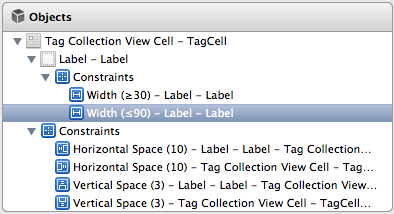
Of course we are not content with using 1) a static size for all items and b) want to have the size automatically adjust to the contents of our cells. Remember that we specified for the cell’s label to use the text size to size it. The edges of the background view are all distanced 5 points away from the edges of the label. So it would be awesome if there was a method to retrieve a cells actual size. Then it would be even more awesome to tell the collection view to use these individual sizes for the items.
A quick test in LLDB shows that the cell returns an intrinsicContentSize of -1, -1 which is the same as not defined. We add an outlet for the label to the TagCollectionViewCell’s header and then we find that conveniently the UILabel returns the size needed by the currently set text/font.
Since we know the amount of space around the constraints we can add that to the label’s intrinsic content size to derive the cell’s size.
// cache for margins configured via constraints in XIB
static CGSize _extraMargins = {0,0};
 
@implementation TagCollectionViewCell
 
- (CGSize)intrinsicContentSize
{
   CGSize size = [self.label intrinsicContentSize];
 
   if (CGSizeEqualToSize(_extraMargins, CGSizeZero))
   {
      // quick and dirty: get extra margins from constraints
      for (NSLayoutConstraint *constraint in self.constraints)
      {
         if (constraint.firstAttribute == NSLayoutAttributeBottom || constraint.firstAttribute == NSLayoutAttributeTop)
         {
            // vertical spacer
            _extraMargins.height += [constraint constant];
         }
         else if (constraint.firstAttribute == NSLayoutAttributeLeading || constraint.firstAttribute == NSLayoutAttributeTrailing)
         {
            // horizontal spacer
            _extraMargins.width += [constraint constant];
         }
      }
   }
 
   // add to intrinsic content size of label
   size.width += _extraMargins.width;
   size.height += _extraMargins.height;
 
   return size;
}
 
@end
This approach gets the actual margin widths from the constrains we have set in Interface Builder. This allows us to keep tweaking the amounts in IB without having to change some constant or #define in code. Since we don’t plan to modify any constraints, we’re lazily setting the static _extraMargins the first time this method is called, as those are constant.
Now the tricky part is dequeue a cell for reuse from the collection view to get the size. This is tricky because the method that calls our dataSource’s collectionView cellForItemAtIndexPath: is also calling collectionView:layout:sizeForItemAtIndexPath:. This prohibits us from dequeuing a cell in the latter method because that would lead to an endless loop.
Some people get their data from a model object and then have a class method on the cell to calculate the needed size. However this doesn’t make use of any constraints which we want to be able to configure in Interface Builder. The smartest solution I could come up with for this chicken and egg problem is to have a separate instance of one such cell as a template and then use its freshly overridden intrinsicContentSize method.
@implementation ViewController
{
   TagCollectionViewCell *_sizingCell;
}
 
- (void)viewDidLoad
{
   [super viewDidLoad];
 
   UINib *cellNib = [UINib nibWithNibName:@"TagCollectionViewCell" bundle:nil];
   [self.collectionView registerNib:cellNib forCellWithReuseIdentifier:@"TagCell"];
 
   // get a cell as template for sizing
   _sizingCell = [[cellNib instantiateWithOwner:nil options:nil] objectAtIndex:0];
}
 
#pragma mark - UICollectionView
 
- (NSInteger)collectionView:(UICollectionView *)collectionView numberOfItemsInSection:(NSInteger)section
{
   return 100;
}
 
- (void)_configureCell:(TagCollectionViewCell *)cell forIndexPath:(NSIndexPath *)indexPath
{
   if (indexPath.row%2)
   {
      cell.label.text = @"A";
   }
   else if (indexPath.row%3)
   {
      cell.label.text = @"longer";
   }
   else 
   {
      cell.label.text = @"much longer";
   }
}
 
- (UICollectionViewCell *)collectionView:(UICollectionView *)collectionView cellForItemAtIndexPath:(NSIndexPath *)indexPath
{
   TagCollectionViewCell *cell = [collectionView dequeueReusableCellWithReuseIdentifier:@"TagCell" forIndexPath:indexPath];
 
   [self _configureCell:cell forIndexPath:indexPath];
 
   return cell;
}
 
- (CGSize)collectionView:(UICollectionView *)collectionView layout:(UICollectionViewLayout*)collectionViewLayout sizeForItemAtIndexPath:(NSIndexPath *)indexPath
{
   [self _configureCell:_sizingCell forIndexPath:indexPath];
 
   return [_sizingCell intrinsicContentSize];
}
 
@end
Right after registering the NIB for use by the collection view I’m creating an instance of the cell and put it into my _sizingCell IVAR. To get an actual item’s cell we have a _configureCell:forIndexPath: method which we call on a dequeued reusable cell instance. For sizing we apply the same method on our sizing cell so that we get the correct intrinsicContentSize for that.

Once More With Auto Layout

When I asked my Tweeps about how I could ask a cell for how much size it would want based on the set constraints,Martin Pilkington was quick to point me towards  -systemLayoutSizeFittingSize:. At first I failed in its application, kept getting {0,0}. But after having written the above workaround I took a heart and tried it once more.
And it worked right away. All that’s needed is to replace this method:
- (CGSize)collectionView:(UICollectionView *)collectionView layout:(UICollectionViewLayout*)collectionViewLayout sizeForItemAtIndexPath:(NSIndexPath *)indexPath
{
   [self _configureCell:_sizingCell forIndexPath:indexPath];
 
   return [_sizingCell systemLayoutSizeFittingSize:UILayoutFittingCompressedSize];
}
This method determines the layout size that fits the passed size the closest. Two standard values are available, UILayoutFittingCompressedSize for getting the smallest size based on the layout constraints, UILayoutFittingExpandedSize to get the largest.
With this in please we can actually get rid of all the intrinsicContentSize stuff we wrote earlier. Also we can fully use the layout constraints to further restrict individual parts of our item cell. Say that you want the label to not go below a certain width for very short labels, and if the label gets too unwieldy then we would want to have the tail truncated.
Further Constrained
This results in the following result, proving that this is indeed what we want.
Custom Sizes
Isn’t that awesome? Let me stress that one more time: you do not need to calculate sizes in a cell class method, essentially duplicating the calculations auto layout would execute. You just ask the system .

Conclusion

In this blog post I have shown how you would create item cells for collections views coming from NIB files. An alternative – and in some aspects more convenient – method is to use the collection view in a storyboard. There the cell prototype would be positioned not in a separate XIB file, but right in the structure hierarchy of the collection view. Exploring how to get a sizing cell there is left as an exercise for the reader.
We found that UILabel conveniently exposes an intrinsicContentSize which is used by auto layout to size it if you specify that in Interface Builder. We explored a technique where we would use a cell instance as template for determine the optimal item size. Then we went one step further and employed a method that actually tells us the perfect size based on all layout constrains and intrinsic sizes.
The code for this example is available on the Cocoanetics Examples repo on GitHub.

Wednesday, 6 August 2014

iOS 7 SDK: Multitasking Tutorial

This tutorial will teach you all about the latest multitasking enhancements provided by the iOS 7 SDK. Specifically, you'll learn about the Background Fetch, Remote Notifications, and Background Transfer Service APIs. Read on!
With iOS 7, Apple has made three new multitasking APIs available to developers:
  • Background Fetch
  • Remote Notifications
  • Background Transfer Service
All these APIs give programmers the ability to develop multitasking applications which will make better use of the device hardware while providing users with a greater experience. This tutorial will teach you more about the above three enhancements and when to use them.
In order to make the Background Fetch API more easily understood, imagine that you want to build a news app. Hypothetically, we make the assumption that this app's content is provided from the web, and one of the essential features is to get updates each time the user launches the app.
Prior to iOS 7, developers could make the app begin getting new content once it was launched. This works, but the downside is that users will need to wait a while every time the app starts. Also, the phone's connection speed becomes a significant factor. Imagine if the user is connecting via a cellular network after a week or two of inactivity! Of course, this is not what developers want, as it tends to degrade the user experience.
On iOS 7, things have drastically changed! With the Background Fetch API, our hypothetical application can actually download new content passively while still remaining in the background. iOS 7 will wake the app up, provide background execution time, and, when the app finishes updating, it goes back to sleep once again. Of course, users aren't notified when this happens. They simply find the new content ready to go upon application launch.
The update process can take place at either predefined intervals set by the programmer or in intervals specified by the operating system. If you set custom intervals, Apple recommends to set them wisely and not to fetch data on the background very often. Doing so will lead to battery drain and wasted system resources. If you simply let the operating system handle things, iOS 7 will make usage predictions. It does this by observing how often the app is launched and at what times. It then anticipates this behavior by going online and fetch content before it predicts the user will want it. For example, if a user of our hypothetic news app launches the app every afternoon, iOS observes this and decides that the app should fetch content sometime in the afternoon and before the usual launch time. Very cool!
The fetching process described above includes three steps:
  1. To enable the background fetch capability
  2. To set the minimum interval time
  3. To implement the new delegate methodapplication:performFetchWithCompletionHandler:
Let's examine things in greater detail.
As I just mentioned, the first step in the whole process is to enable the background fetch capability for the application in Xcode 5. This can be done in two ways. The first way is to use the .plist file, where you need to add the Required background modes key with the fetch value, like this:
gt7_1_plist_fetch
The following steps are an alternative approach:
  • Click on the project name at the top left side in Xcode
  • Click on the Capabilities tab in the middle window
  • Under the Background Modes option, check the Background Fetch checkbox
gt7_2_capabilities_fetch
By default, the initial fetch interval value is set to theUIApplicationBackgroundFetchIntervalNever mode, which means that the background fetching will never be performed. If this value doesn't get changed, the background fetch won't work, even if it is enabled with one of the two ways discussed above. To accomplish this, you need to go to theapplication:didFinishLaunchingWithOptions: and set the minimum fetch interval value as follows:
1
2
3
4
5
6
- (BOOL)application:(UIApplication *)application didFinishLaunchingWithOptions:(NSDictionary *)launchOptions
{
    [application setMinimumBackgroundFetchInterval:UIApplicationBackgroundFetchIntervalMinimum];
     
    return YES;
}
The UIApplicationBackgroundFetchIntervalMinimum is the minimum interval value allowed and managed by the system. Of course, you can set a custom time interval simply by providing the method above with a NSTimeInterval value. However, unless it is necessary, it's generally better to let iOS decide when it should allow the app to work within the background and fetch new content. If you do set a minimum, it's important to realize that the UIApplicationBackgroundFetchIntervalMinimumdoesn't absolutely determine the timing. They are more like suggestions. iOS will try to follow the schedule if it can, but, depending on the available system resources, the fetching may happen more or less often than desired.
The last step required is to implement the newly addedapplication:performFetchWithCompletionHandler: delegate method. This one is called every time that a background fetch should be performed. The completion handler of the method accepts any of the following three values to let iOS know about the fetch results:
  1. UIBackgroundFetchResultNewData: If new data was found by the fetch
  2. UIBackgroundFetchResultNoData: If no new data was found
  3. UIBackgroundFetchResultFailed: If an error occurred during the fetch process
Let's see this in action:
01
02
03
04
05
06
07
08
09
10
11
12
13
14
15
16
17
-(void)application:(UIApplication *)application performFetchWithCompletionHandler:(void (^)(UIBackgroundFetchResult))completionHandler{
     
    // Call or write any code necessary to get new data, process it and update the UI.
     
    // The logic for informing iOS about the fetch results in plain language:
    if (/** NEW DATA EXISTS AND WAS SUCCESSFULLY PROCESSED **/) {
        completionHandler(UIBackgroundFetchResultNewData);
    }
     
    if (/** NO NEW DATA EXISTS **/) {
        completionHandler(UIBackgroundFetchResultNoData);
    }
     
    if (/** ANY ERROR OCCURS **/) {
        completionHandler(UIBackgroundFetchResultFailed);
    }
}
In case new data is found, you must also make any necessary user interface updates. These must occur right away for two reasons: (1) users should see the content when the app is next launched, and (2) the app snapshot will remain updated.
There are a few more facts you should know. First, when the app launches in the background, it has about thirty seconds at its disposal to complete all of the required tasks and call the completion handler. If this time limit is exceeded, the app will become suspended again. For apps that need more than 30 seconds (perhaps because of media downloads), you should schedule a background fetch using the Background Transfer Service API. We'll discuss this option more later.
After you have your fetching mechanism set up and ready to work, Apple provides two ways to test the background fetch when using the Simulator.
The first approach follows these steps:
  • Run the application as usual on the Simulator
  • While the app is running, go back to Xcode
  • Click on the Debug > Simulate Background Fetch menu
This way is useful to try the API while the app is running. The second way is more involved, but it allows you to test the app while it remains in the background. To try this, follow these steps:
  • Go to the Schemes list and click on the Manage Schemes... option.
    gt7_3_manage_schemes
  • Make sure that the current scheme is selected and then duplicate it by clicking on the gear button at the bottom side of the window and selectingDuplicate.
    gt7_4_duplicate_scheme
  • Set a name for the duplicate if you'd like.
  • Have the Run option selected at the left pane, then click on the Options tab.
  • Check the Launch due to a background fetch event checkbox and click OKtwice.
    gt7_5_scheme2
  • Run the app using the duplicated scheme.
Background fetch is meant to be used for non-critical app updates since the time that it occurs may differ. For more critical updates, see the Remote Notifications section coming up next. Generally, the background fetch API is suitable for applications that want to seamlessly manage content. A few example app categories include news, social network, weather, and photo sharing.
Imagine that we build an application with both written and video tutorials. Let's suppose that users can download new tutorial videos 2-3 times per month. So, how would we make our users aware of new video releases? We can't adopt a solution that uses the background fetch API or something similar, as this would lead to both waste of device resources and pointless requests to the server. We also cannot know when a new video release is ready. Therefore, we need to use Push Notifications, so every time there is new content, we can let our users know about that simply by alerting them. We would expect our users to consequently launch the app and download new content. The problem is that this approach forces the user to wait for the video to download, and if the content is large enough, they may have to wait for a long time. So, how can users obtain new content in their application when this content is available but without the wait?
This is where Remote Notifications come in handy. Remote Notifications are actually silent push notifications, meaning push notifications that do not inform users about their existence. When a new remote notification arrives, the system silently wakes the app so it can handle the notification. The application is then responsible for initiating the download process for the new content. When it finishes downloading, a local notification is sent to the user. When the application is launched, the new content is there awaiting the user.
Just like Background Fetch, Remote Notifications aim to eliminate the waiting time that users face when downloading new content or uploading data to a server. Both of the APIs work within the background thread and users are notified after the job has been completed. However, Remote Notifications are suitable in cases where content is either infrequently updated or is otherwise critical to the user experience.
In order to use Remote Notifications within an application, you will first need to enable them. You can do this with either the *.plist file or the new Capabilitiesproject tab. If you want to use the *.plist file, you need to add the Required Background key with the remote-notification value as follows:
gt7_6_plist_remote
To use the Capabilities tab, follow these steps:
  • Click on the project name at the top left side in Xcode
  • Click on the Capabilities tab in the middle window
  • Under the Background Modes option, check the Remote Notificationscheckbox
gt7_7_capabilities_remote
The next step is to implement theapplication:didReceiveRemoteNotification:fetchCompletionHandler: delegate method in your AppDelegate file. This one is called when a new notification arrives. Use the completion handler to notify iOS about the result of the data fetch:
1
2
3
4
5
6
-(void)application:(UIApplication *)application didReceiveRemoteNotification:(NSDictionary *)userInfo fetchCompletionHandler:(void (^)(UIBackgroundFetchResult))completionHandler{
     
    // Call or write any code necessary to download new data.
     
    completionHandler(UIBackgroundFetchResultNewData);
}
Making a notification silent is fairly easy. In the notification payload you just have to include the code-available: 1 flag and omit any alert or sound data that would notify the user.
1
2
3
aps{
   content-available: 1
}
In general, everything that is valid when working with Background Fetch applies here too. For example, you have 30 seconds at maximum to download any new content and notify the system in the method above before the app goes to sleep again. If the new content needs time to be downloaded, then consider the use of the Background Transfer Service API.
Keep in mind that Apple controls the rate of the remote notification delivery (silent push notifications) that are sent from a push provider. If the rate is normal, then both normal and silent notifications are delivered right away. However, when silent notifications are being sent quite frequently, the Apple Push Service stores them for delivery at a later time. Make sure you send any remote notifications wisely.
Another great feature of iOS 7 is the Background Transfer Service API. Traditionally, getting or sending big chunks of data has not been easy, mainly due to running time limitations and to transferred data management. Applications were required to finish most of the uploading or downloading process while they were in the foreground. However, with iOS 7, things are totally different. Applications can enjoy greater freedom when performing background tasks. First of all, with the background transfer service, applications are given as much time as they need to complete a transfer. Whether they are in the foreground or in the background is irrelevant. Time limitations no longer exist and the system is now responsible for managing the data that is being uploaded or downloaded. Even if an application is not running, iOS wakes it up to handle situations where decisions must be made. A few examples of this include when a file download completes or when more information should be provided to the server.
The background transfer service is based on the NSURLSession class, which has just been introduced with iOS 7. This class is responsible for transferring data via HTTP or HTTPS, and it provides the ability for background network-related tasks. The whole idea behind it is simple and it is based on the use of a sessions, where a single session manages all related data transfer tasks. There are various session types available, but the background sessions is the one we care about here, and it always work on separate threads (processes) created by the system. Background sessions support both download (NSURLSessionDownloadTask) and upload (NSURLSesssionUploadTask) tasks, which are added to background NSURLSessionobjects.
Another noteworthy fact related to background transfers is that a transfer can be discretionary or non-discretionary. Non-discretionary transfers can be initiated only when the application is in the foreground, but there is an option to set the discretionary state according to the application's needs. Discretionary transfers are mostly preferred, because these allow the operating system to achieve more efficient energy management on the device. There is also one limitation that applies on discretionary transfers, and that is that they should be performed only over WiFi networks. Background thread transfers are always initiated as discretionary transfers.
The delegate methodapplication:handleEventsForBackgroundURLSession:completionHandler: is called when a background transfer completes so the finished task can be handled. For example, if new content was downloaded, you should implement this delegate method to store it permanently and update the UI if needed. This method is also called when credentials are required from the app in order to continue the transfer. Generally, in this delegate method you apply all the necessary logic required by your application when a download or upload process is over and the application exists within the background thread. Of course, you use the completion handler to let the system know when you are done so it can put the app back to sleep.
The background transfer service is ideal for use in conjunction with the background fetch and the remote notification APIs. Granted the above, it becomes clear that the best practice is to use the delegate methods of the background fetch and the remote notifications to enqueue your transfers and let the system do the job. After all, unless the data that should be exchanged with the server has a small footprint, in most cases the 30 seconds provided to just the two mentioned delegate methods is enough to setup the background transfer and any related tasks. Use theNSURLSession class to define all the transfers you want and to make sure that your app will fetch any new content. It will also send any data that should be processed, regardless of the time required.
Background Fetch, Remote Notifications, and the Background Transfer Service APIs are features that developers would love to have seen a long time ago. Thankfully, with the release of iOS 7 Apple has made it easier than ever to process application data. From iOS 7 onward, app content can virtually always be up-to-date, but it's ultimately up to each developer to take care of this and use the tools provided! Happy multitasking, and thanks for reading!

203 Favorite JavaScript Utilities

https://1loc.dev/